This here post was written by friend of the blog, Al who can usually be found doing Let’s Plays of Darkest Dungeon, Binding of Issac and more over at You & I Play. Find them on Twitter here or Al personally on twitter here.
Before we started doing let’s plays there seemed to be an insurmountable series of things I had no idea how to even start dealing with. I’m aware that if you have a PS4 you just press a couple of buttons and then you’re live on Twitch, but a) I don’t have a PS4 and b) I wanted a bit more professionalism, and a YouTube series. Live streams can come later.
My primary concern was cost. I couldn’t afford professional hardware or professional software, but I still wanted my audio quality to be a step above the average youtuber. The hardware took a bit of experimentation, but the software seemed obvious: open-source.
See, I’ve always been an open-source advocate and I would choose open-source software over proprietary even if it were awkward, but in this case, it seemed like the alternatives were just so pricey (or dicey) that I really didn’t have a choice. It might also seem tempting to pirate some professional software to give yourself a kick start, but do me a favour – bad enough I’m forced to run Windows without tempting fate by opening myself up to all sorts of malware.
So I experimented with hardware, and looked to FOSS for my software needs, with mixed success. In this post I’ll discuss the hardware and the quick-and-dirty software; in the next post I’ll talk about the slightly more advanced (and tentative) techniques I’ve been using to post-process the videos.
Hardware
I messed around with various ways of recording two people at once. The problem with headsets is you need to be able to plug two in at once. Most computers have one mic in at the back, and one headset port at the front. This might work. I didn’t try this because in order to get a quality headset I’d have to spend my whole budget, and I wanted two.
If it’s just you, get a decent headset. That will be more than good enough.
I experimented with mic-only headsets but it turned out the one I got was a dynamic microphone, meaning the voltage from the PC caused intense noise. I also bought a mini mixer so I could plug two in at once, which was a bit too much money for saying it didn’t actually do what I wanted, but also now I have a mini mixer, so it’s not all bad.
The point is, don’t get a dynamic mic.
I happened to get lucky and find a Blue Snowball at half price, solving my budget woes. I should have gone with this first – the Blue Snowball is a very common mic for youtubers, and being desk-standing it meant we could both talk at once. I also got a pop filter, but I’m not sure whether it’s helping. I daren’t take it off. The mic is suspended by a boom (about £7) that I’ve got attached to a shelf above the desk. This ensures keyboard clatter is not transmitted through the desk and up to the microphone, but if you don’t have a shelf, you can get elastic things that the mic hangs in, as a sort of shock absorber.
In our early videos you can hear that the room has a lot of reverb. This is because there was a hard wall right behind us when we recorded those videos. While not a massive deal, I was not entirely happy with this sound, and considered buying a bunch of acoustic foam tiles to cut down on this. I still am considering that, but now that we’re in a different place, the acoustic properties of the room are different, so it’s less of a big deal. If you’re concerned about the echo in your room, though, you can do worse than buying £30 worth of these tiles and sticking them to a piece of plasterboard (so you don’t wreck your wall).
The mic was the only thing I needed to buy, but I also upgraded my entire computer. Biggest feature of this is the video card. If you intend to record any 3D stuff, or anything heavily CPU-intensive, you probably want to get an nVidia card. The reason for this is that, unless you have a stupidly high-end CPU, more memory than I do, and two SSDs, you’re going to want to get the video card to encode the video for you. ATI cards don’t have this capability; or at least, not one the de facto standard recording software can take advantage of.
You could do a similar thing with Intel but I don’t think Intel even make external video cards. However, you might be able to record on your laptop if you already have a mid-level gaming laptop with an Intel video chipset.
When using nVidia’s codecs to record, you’ll end up with massive files. A 30-minute video can reach 3GB or more. So you’ll want to invest in a big enough disk, too.
Finally, you might want to invest in a largeish SSD. You can get 250GB for about 70 quid. This will help with loading times, and let you offload the recorded data to disk faster, freeing up memory; RAM was one of the other things I upgraded, to 16GB, meaning I can comfortably fit an entire video in memory if needed, but at the expense of the memory required to actually run the game.
Ultimately, it wasn’t cheap to get a gaming rig suitable for YouTube, but I think I set my standards a bit too high, and if I already had a decent gaming rig, I would only have spent the £35 on a Blue Snowball.
Software
For all forms of recording you’re going to need one thing: OBS. OBS is the Open Broadcaster Software and is a fairly common tool that streamers and YouTubers alike use. We use it for all the things we record and have tested it with both Twitch and YouTube for live streaming.
In this post we’ll cover easy mode. Easy mode is where you press a hotkey to start recording, and you press it again to stop. You’ll have to stick the videos together later, but you can do that with YouTube itself.
We’ll do a quick setup of OBS so you don’t have to mess around trying to find the tutorials on it.
OBS Profiles
I recommend two profiles; one for low-power stuff and one for high-power stuff. Low-power is stuff like The Binding of Isaac, Darkest Dungeon, Invisible Inc – stuff that doesn’t really make much use of your graphics card’s 3D capabilities. This stuff, your CPU can encode on the fly, and the x264 codec that OBS uses seems a lot more capable of producing sensibly-sized videos than nVidia’s hardware one.
This means that your CPU game recordings are going to be a lot smaller than your nVidia ones.
You probably also want to create a profile for streaming, too. We’ll discuss the foibles of streaming later.
To set up a profile, well, you’re already on a profile, so you head to settings and start changing stuff. You can pick the profile you’re setting up, as well as add new profiles, from the General page.
Recording
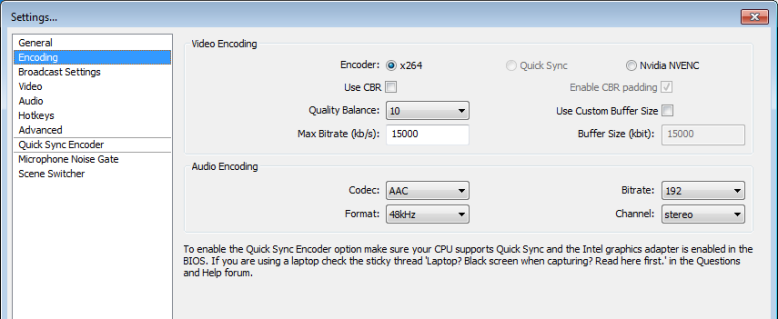
Most of your setup is on the Encoding page. Here are the settings I’ve got the best value out of so far.
Audio is simple: AAC, 48kHz, 192kbps, stereo.
Video is more complex.
|
Software |
Hardware |
| Encoder (video) |
x264 |
NVENC |
| Use CBR |
No |
No |
| Max Bitrate |
15000 |
30000 |
| Quality Balance |
10 |
10 |
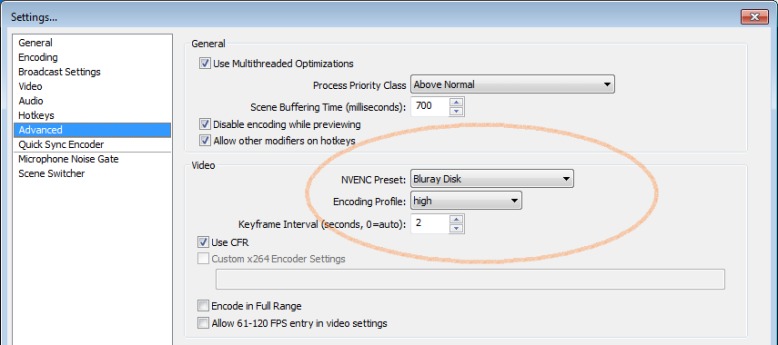
| Preset |
veryfast |
Bluray Disk |
| Profile |
main |
high |
| Use CFR |
Yes |
Yes |
The first four are in Encoding, and the last three are in Advanced. The names of “Preset” and “Profile” are different in software and hardware mode because they configure the encoder, but they’re the first options in the Video section of Advanced. Check the screenshots below for a better idea of what I’m talking about.
The “Bluray Disk” setting for NVENC is a strange one, but I went through all the options, testing it on Bioshock Infinite, and this one was the least weird.
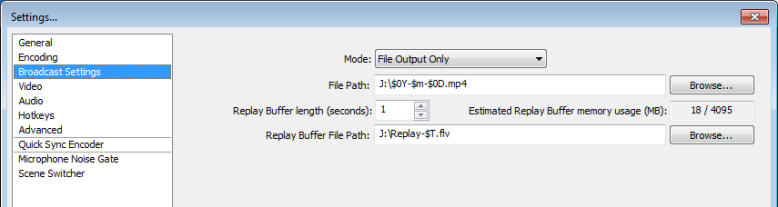
You also want to set your Mode in Broadcast Settings to File Output Only, and remember to set up your Hotkeys to whatever you would like.


Streaming
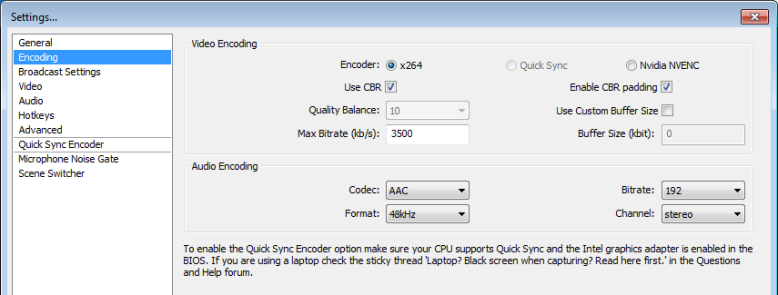
If you want to actually stream, you should really change up your settings. Most streaming services have a bandwidth cap, which means you’re going to be stuck with a max bitrate for your video. This is fine for x264, but not amazing for NVENC, because NVENC seems to consume every ounce of bitrate it can.
I have yet to actually try streaming with NVENC set to such a low value, but low-bitrate 2D streaming seems to work fine.
Themain changes you will make are a) to reduce the bitrate to about 3500 (5000 is the absolute max on Twitch, but you’ll rarely need that much) and b) turn on CBR. CBR is constant bit rate, which will mean the stream will sacrifice quality to preserve bitrate; this will ensure you don’t suddenly send 10kbps down Twitch and cut yourself off or lag everyone out.
If you want a decent quality recording as well as a stream that won’t get you kicked off Twitch, you can actually run OBS twice; once using NVENC at your normal recording settings, and once using your Twitch settings. To do this, you need to edit your OBS shortcut (either on desktop or in the Start menu (is it even still called the Start menu?)) and add -multi to the Target field. Normally, OBS would not run twice, and this enables that behaviour.
Advanced Mode
Hopefully this is enough to get people started doing let’s plays or streams without the blocker of having no idea where to begin. In the next episode article, I’ll explain how I use ffmpeg, Audacity, Inkscape, and some Perl to fix my audio, cut up the video before uploading, and create the thumbnail.